The Noco Genius 1 is a popular battery charger and maintainer that keeps car, motorcycle, and boat batteries healthy. It’s known for its small size, smart charging features, and easy operation. But sometimes, users see a blinking red light on the device and wonder what it means. This article will help you understand why the Noco Genius 1 blinks red, what you should do, and how to prevent battery and charger problems in the future. You’ll also find comparisons, troubleshooting steps, and practical tips for beginners and experienced users.
What Does The Noco Genius 1 Blinking Red Mean?
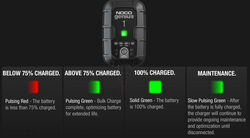
When the Noco Genius 1 shows a blinking red light, it’s trying to tell you something important about your battery or the charging process. The blinking red usually means one of these things:
- Battery polarity error: The charger’s cables are connected to the wrong battery terminals.
- Battery voltage too low: The battery has fallen below the minimum voltage the charger can recognize.
- Charger not detecting a battery: There’s no battery connected or the battery is too damaged to be detected.
- Internal charger error: There might be a fault in the charger itself.
Most often, the blinking red is about connection or battery health, not a broken charger. Understanding what causes each situation can save time and help you avoid mistakes.
The Main Causes Of Blinking Red
1. Wrong Connection (polarity Error)
The Noco Genius 1 is designed to protect you and your battery. If you connect the red clamp to the negative terminal and the black clamp to the positive terminal, the charger senses this mistake and blinks red. It’s a warning that the connections are reversed.
2. Extremely Low Battery Voltage
Lead-acid batteries (like those in cars and motorcycles) should usually have at least 7 volts for the charger to start safely. If your battery drops below this, the Noco Genius 1 blinks red because it cannot begin charging. This is common with deeply discharged or old batteries.
3. No Battery Detected
If the charger doesn’t sense any battery, or the battery is damaged (broken cells, internal short), the blinking red appears. The charger checks for electrical resistance and voltage before starting, so a completely dead battery may not trigger charging.
4. Internal Charger Fault
Rarely, the charger itself may have a problem. If all connections are correct and the battery is healthy, but the red light keeps blinking, the device may need service or replacement.

Credit: www.youtube.com
Troubleshooting Steps For Noco Genius 1 Blinking Red
When you see the blinking red light, follow these steps to find the cause and fix it:
- Check cable connections. Make sure the red clamp is on positive, black on negative.
- Inspect battery terminals. Clean any corrosion or dirt. Dirty contacts can stop the charger from sensing the battery.
- Measure battery voltage. Use a multimeter to check if the battery has at least 7 volts. If not, the charger may not work.
- Try a manual mode. The Noco Genius 1 has a “force mode” for low-voltage batteries. Hold the mode button for 5 seconds to force charging.
- Swap batteries. Test the charger with another battery. If it charges, the original battery may be faulty.
- Check for internal charger issues. If the charger blinks red with all batteries, contact Noco support.
Many beginners skip step 4, not realizing force mode can help with deeply discharged batteries. Also, cleaning battery terminals is often overlooked but makes a big difference.
Noco Genius 1 Vs Other Chargers: Blinking Red Behavior
It helps to compare how the Noco Genius 1 handles errors compared to other popular chargers. Here’s a simple comparison:
| Charger Model | Blinking Red Meaning | Minimum Battery Voltage | Error Handling |
|---|---|---|---|
| Noco Genius 1 | Polarity, low voltage, no battery | ~7V | Force mode, error indicator |
| Battery Tender Jr | Polarity, low voltage | ~8V | Manual reset needed |
| CTEK MXS 5.0 | Polarity, low voltage, temperature | ~8V | Automatic error shutdown |
The Noco Genius 1’s force mode is a useful feature for recovering batteries that other chargers may not charge.
Practical Tips To Prevent Blinking Red
You can avoid most blinking red errors with these habits:
- Always double-check cable connections before turning on the charger.
- Clean battery terminals with a wire brush or baking soda solution.
- Charge batteries regularly, especially before long storage periods.
- Use a multimeter to check battery voltage before charging if your battery is old or hasn’t been used in weeks.
- Store the charger in a dry, cool place to avoid internal faults.
Many users don’t realize that storing batteries in cold or humid conditions can lower their voltage quickly. Regular checks and cleaning can prevent most charging problems.
Battery Types Supported By Noco Genius 1
The charger works with several battery types, but each has its own charging needs.
| Battery Type | Supported? | Voltage Range | Typical Use |
|---|---|---|---|
| Lead-acid (AGM, flooded) | Yes | 6V & 12V | Cars, motorcycles, boats |
| Lithium-ion (LiFePO4) | Yes | 12V | Power sports, backup systems |
| Gel | Yes | 12V | Wheelchairs, scooters |
| Deep-cycle | Yes | 12V | RVs, solar storage |
Always check your battery type and follow the manufacturer’s instructions. Charging lithium batteries with the wrong mode can damage them or cause safety risks.

Credit: www.afvt.org
How To Use Force Mode Safely
If your battery is below the minimum voltage, force mode can help. Here’s how to do it step-by-step:
- Connect the charger clamps correctly.
- Press and hold the mode button for 5 seconds until the red light turns solid (not blinking).
- The charger will begin charging even if it doesn’t detect the battery.
- Monitor the battery for signs of overheating or bulging.
- After 30–60 minutes, check the voltage. If it rises above 7 volts, switch to normal mode.
Only use force mode for batteries you know are safe and not damaged. If the battery heats up, stop charging immediately.
Common Mistakes When Using Noco Genius 1
Many beginners make these mistakes:
- Wrong clamp connection: Even experienced users sometimes mix up red and black clamps.
- Ignoring dirty terminals: Corrosion stops the charger from working correctly.
- Trying to charge dead batteries: If a battery is physically damaged, the charger’s blinking red won’t go away.
- Not reading the manual: The Noco Genius 1 manual has valuable troubleshooting tips.
- Using the charger in wet conditions: Moisture can cause internal faults.
Avoiding these mistakes can extend the life of your charger and your batteries.
Credit: www.etrailer.com
Is Blinking Red Always Bad?
Not always. The blinking red is a warning, but it’s not a sign of a broken charger most of the time. It’s the charger’s way of protecting you and your battery. Fixing the cause (connection, voltage, or battery health) usually solves the problem.
If the charger blinks red after you fix these things, then consider contacting Noco support or checking their help articles. For more technical info, you can visit the official Noco website or read up on battery care at Battery University.
Real-world Example: Recovering A Dead Battery
A motorcycle owner left his bike unused for 4 months. The battery dropped to 4 volts, and the Noco Genius 1 blinked red. He cleaned the terminals, checked the voltage, and used force mode. After 1 hour, the battery reached 8 volts.
The charger switched to normal charging, and the battery was saved.
This shows the importance of knowing how to use force mode and keeping battery terminals clean.
When To Replace Your Battery
If you’ve tried all troubleshooting steps and the blinking red stays, your battery may be permanently damaged. Signs your battery needs replacing:
- Swollen or leaking casing
- Unable to hold charge after charging
- Voltage drops quickly after charging
- Charger blinks red with all charging attempts
Don’t keep trying to charge a battery that shows these signs. It’s safer and cheaper to buy a new one.
Frequently Asked Questions
What Does A Blinking Red Light Mean On My Noco Genius 1?
A blinking red light usually means there’s a connection error, the battery voltage is too low, or no battery is detected. Check your cable connections and battery health first.
Can I Use Force Mode To Charge Any Battery?
Force mode is useful for low-voltage batteries. Only use it for batteries that are not physically damaged or leaking. Monitor the battery for overheating while using force mode.
How Do I Clean Battery Terminals?
Use a wire brush or a mixture of baking soda and water. Scrub the terminals gently and wipe them dry before connecting the charger.
Is It Safe To Leave The Noco Genius 1 Connected Overnight?
Yes, the charger has smart monitoring and will maintain the battery without overcharging. However, always check the battery for signs of damage before long-term charging.
What Should I Do If My Charger Keeps Blinking Red After Troubleshooting?
If all connections are correct, the battery is healthy, and the charger still blinks red, contact Noco support. The charger may have an internal fault or need service.
Conclusion
The Noco Genius 1 is reliable and safe, but understanding its signals and proper use can save time and money. If you follow the steps and tips above, you can solve most blinking red problems and keep your batteries in top condition.