
If you own a Ryobi power tool, you probably rely on your Ryobi charger to keep your batteries ready for work. But what does it mean when you see your Ryobi charger blinking green? Is it normal, or does it signal a problem? Understanding these lights is important—especially if you want to keep your tools running smoothly and your batteries lasting longer. In this guide, you’ll learn what the blinking green light means, why it happens, common issues, and how to fix or prevent them. You’ll also see real examples, practical troubleshooting steps, and expert tips that most beginners miss.
What The Blinking Green Light Means
A blinking green light on your Ryobi charger is usually a positive sign. It almost always means the charger is working to charge your battery. But there are different types of green blinks, and each has its own meaning:
- Fast blinking green: Charging in progress.
- Slow blinking green: Battery is almost charged—usually above 80%.
- Solid green: Battery is fully charged and ready to use.
Knowing the difference between these signals helps you avoid confusion. Some chargers may use slightly different patterns, so check your model’s manual for details.
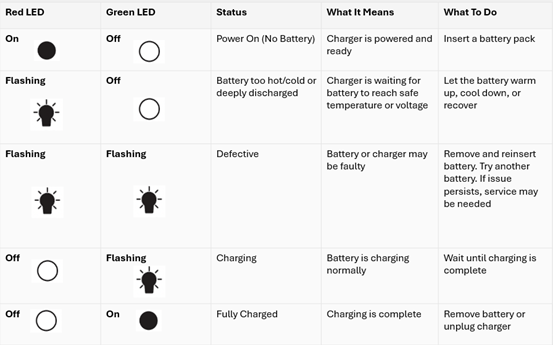
Quick Reference: Ryobi Charger Light Patterns
Here’s a simple comparison of typical Ryobi charger light behaviors and what they mean:
| Light Pattern | Status | What You Should Do |
|---|---|---|
| Blinking Green (Fast) | Charging | Let it charge |
| Blinking Green (Slow) | Nearly Charged | Wait, almost done |
| Solid Green | Fully Charged | Remove battery |
| Blinking Red | Error or Battery Problem | See troubleshooting |
| Off | No Battery Detected | Check connection |
Why Your Ryobi Charger Blinks Green
The charger communicates with the battery using LED lights. When you see the green light blinking, the charger is actively sending current to the battery. This means:
- The battery is installed correctly
- The charger is receiving power
- The battery is not yet full
Most Ryobi chargers will continue to blink green until the battery reaches about 80% charge. After that, the blinking slows or turns solid green, telling you the battery is almost or fully charged.
Example: Charging A 4ah Ryobi Battery
Let’s say you put a 4Ah Ryobi battery on the charger. You notice a fast blinking green light. This means the charger is working as expected. After about an hour, the light slows down, then becomes solid green. You can now remove the battery safely.

Credit: www.sunjosho.com
Common Issues Associated With A Blinking Green Light
While a blinking green light usually means normal charging, there are a few situations where it may signal something else. Here are some issues to watch for:
- Blinking Green but Not Charging: Sometimes, the charger blinks green, but the battery never charges. This can mean the battery is too hot or too cold, or it has internal damage.
- Switches from Green to Red: If you see a blinking green that suddenly turns red, it can mean a connection issue or a defective battery.
- Green Light Never Goes Solid: If the charger blinks green for hours without stopping, the battery may be near the end of its life.
These problems are less common, but knowing them can save you time and frustration.
Real Example: Faulty Battery Symptoms
A user places a Ryobi battery on the charger. The green light blinks for hours, never turning solid. When the battery is inserted in a tool, the tool won’t run. This usually means the battery cells are worn out, and the charger cannot bring them to full charge.
Troubleshooting A Blinking Green Light
If your Ryobi charger’s green light is blinking and you suspect something is wrong, try these steps:
- Remove and Reinsert the Battery: Sometimes, dust or a loose connection causes charging errors. Remove the battery, clean the contacts, and try again.
- Check Battery Temperature: Ryobi batteries have safety circuits that prevent charging if they’re too hot or cold. Let the battery reach room temperature before charging.
- Inspect for Damage: Look for cracks, leaks, or corrosion on the battery. Damaged batteries should not be charged—replace them instead.
- Try a Different Battery: Test the charger with another Ryobi battery. If the new battery charges normally, the issue is with the first battery.
- Try Another Charger: If possible, test your battery on a different charger. If it charges, your original charger may need repair or replacement.
- Reset the Charger: Unplug the charger for 60 seconds, then plug it back in. This resets the internal circuits and can fix minor glitches.
Common Mistakes During Troubleshooting
- Ignoring temperature warnings: Charging a hot battery can shorten its life.
- Forcing damaged batteries onto the charger: This can damage the charger itself.
- Using non-Ryobi batteries: Third-party batteries may not communicate properly with the charger.
Ryobi Charger Models And Their Indicator Lights
Ryobi makes several types of chargers, each with its own set of indicator lights. Understanding your model helps you read the signals correctly. Here’s a quick comparison of popular models:
| Charger Model | Supported Batteries | LED Indicator Features |
|---|---|---|
| P118B | 18V ONE+ | Green, Red (blinking/solid) |
| P117 | 18V ONE+ | Green, Red (blinking/solid, temperature warning) |
| P137 | 18V ONE+, 14.4V | Green, Red, Orange (advanced diagnostics) |
| P125 | 18V ONE+ (dual port) | Green, Red (for each slot) |
Always refer to your charger’s manual for exact light patterns, as they can vary slightly.
How To Maximize Battery Life And Charging Safety
Proper use of your Ryobi charger and batteries can add years to their life. Here are some best practices:
- Charge at room temperature: Ideal is between 50°F and 80°F (10°C–27°C).
- Avoid leaving batteries on the charger: Remove them once fully charged.
- Store batteries partially charged: For long storage, keep them at about 50% charge.
- Keep contacts clean: Use a dry cloth to wipe battery and charger contacts.
- Do not use damaged batteries: Replace any battery that looks swollen, cracked, or leaks.
Hidden Insights Most Beginners Miss
- Battery “Wake-Up”: If a battery has been unused for a long time, the charger may blink green for several minutes before it starts a normal charge. This is the charger “waking up” the battery.
- Charger Location: Placing your charger in a dusty garage or in direct sunlight can cause it to overheat or malfunction. Always use the charger in a clean, dry, and ventilated area.

Credit: www.youtube.com
When To Replace Your Ryobi Battery Or Charger
No battery or charger lasts forever. If you notice any of these signs, it may be time for a replacement:
- Battery won’t charge at all
- Charger’s lights don’t turn on
- Battery charges but runs out very quickly
- Charger gets unusually hot
Ryobi batteries typically last 3–5 years with proper care. Chargers can last even longer, but only if used correctly.
Cost Comparison: New Battery Vs. New Charger
Here’s a quick look at what you might pay to replace each:
| Item | Average Cost (USD) | Warranty (years) |
|---|---|---|
| Ryobi 18V 4Ah Battery | $60–$80 | 3 |
| Ryobi P118B Charger | $30–$50 | 3 |
| Ryobi Dual Port Charger | $60–$90 | 3 |
You can often find deals on bundles, especially during sales.
Safety Tips For Charging Ryobi Batteries
- Never cover the charger while in use: This can trap heat and cause damage.
- Don’t charge near water: Keep chargers and batteries away from sinks and wet areas.
- Unplug after charging: Reduces fire risk and saves energy.
- Use only Ryobi-approved chargers: Third-party chargers can damage batteries or void the warranty.
For more safety information, you can visit the official Ryobi Safety Support page.
Credit: support.ryobi.com.au
Frequently Asked Questions
What Should I Do If My Ryobi Charger Blinks Green But The Battery Won’t Charge?
First, remove the battery and let it cool to room temperature. Clean the contacts and try again. If it still won’t charge, test another battery or charger. If the problem continues, your battery may be damaged and need replacement.
How Long Does It Take To Fully Charge A Ryobi 18v Battery?
Charging time depends on battery capacity and charger model. A standard 4Ah battery typically takes 60–90 minutes with a fast charger and up to 3 hours with a basic charger.
Is It Safe To Leave My Ryobi Battery On The Charger Overnight?
It’s best to remove the battery once fully charged. While Ryobi chargers have safety features to prevent overcharging, long-term storage on the charger can reduce battery life over time.
What Does It Mean If The Green Light On My Ryobi Charger Never Stops Blinking?
If the green light never turns solid, the battery may be too old or damaged to reach a full charge. Try another battery to confirm whether the charger or battery is at fault.
Can I Use A Third-party Charger With My Ryobi Batteries?
It’s not recommended. Third-party chargers may not have the same safety features and can damage your Ryobi batteries or void your warranty. Always use a Ryobi-approved charger for best results.
Understanding your Ryobi charger’s blinking green light helps you maintain your power tools and batteries safely and efficiently. With the right care and attention to the signals your charger gives, you’ll save money, reduce frustration, and keep your tools ready whenever you need them.