If you’ve ever pressed your garage door remote and watched the door refuse to close, with a blinking light staring back at you, you know how frustrating this moment can be. This problem is common in homes with automatic garage doors, but the blinking light is more than just an annoyance—it’s a signal.
It often means something is wrong with the safety sensors or the door system. If you’re facing this, you’re not alone, and you can fix it yourself in most cases. With the right steps and clear guidance, you don’t need to call an expert right away.
Many garage doors have a built-in safety feature: a pair of sensors that stop the door from closing if something is in the way. These sensors use lights to show their status. When the door won’t close and the light blinks, it’s the system’s way of telling you there’s an issue. Sometimes it’s a simple fix, like cleaning the sensors. Other times, you may need to check wiring or adjust alignment. Understanding what the blinking light means—and how to fix it—can save you time, money, and stress.
What Causes A Garage Door Won’t Close With Blinking Light
When your garage door won’t close and you see a blinking light, several possible causes are at play. The blinking light is not just random—it’s a coded message from your garage door opener.
- Obstructed Safety Sensors: The most common cause is something blocking the sensors. These sensors are usually installed near the bottom of the door tracks, facing each other. If something breaks the invisible beam between them, the door won’t close.
- Dirty or Misaligned Sensors: Dust, spider webs, or even slight bumps can cover or move the sensors. If the sensors can’t “see” each other, the light blinks, and the door stays open.
- Damaged Wiring: Wires connecting the sensors to the opener can get loose or damaged, especially in older systems or after storms. Faulty wires mean poor communication, causing the system to blink and stop.
- Sensor Power Issues: If one sensor loses power, the blinking light is a warning. This may be caused by a blown fuse or a problem in the opener.
- Manual Lock or Force Setting: Some garage doors have manual locks or force settings. If the lock is engaged or the force setting is too low, the opener’s light may blink, and the door won’t close.
- Remote Control Interference: Rarely, remote signals can interfere with the sensors’ operation. If the blinking happens only with the remote, this could be the cause.
Non-obvious insight: Many homeowners don’t realize temperature changes can affect sensor alignment. During winter or summer, the tracks can expand or contract, moving the sensors just enough to break their connection.
Decoding Blinking Light Patterns
Garage door openers use blinking lights to communicate specific problems. Different brands have their own patterns and meanings.
Common Blinking Patterns
- 1 Blink: Usually means sensor is blocked or dirty.
- 2 Blinks: Often signals sensor alignment problem.
- 4 Blinks: May indicate wiring issues or sensor power loss.
How To Read Your Opener’s Light Codes
Check your garage door opener manual or look for a chart inside the opener cover. Many brands include a guide to blinking patterns. For example, LiftMaster and Chamberlain openers use one sensor with a steady light and one with a blinking light to show the issue. If you don’t have the manual, you can search for your model online.
Brand Comparison Table
Here’s a quick comparison of common brands and their blinking light codes.
| Brand | 1 Blink | 2 Blinks | 4 Blinks | Other Codes |
|---|---|---|---|---|
| LiftMaster | Sensor blocked | Misalignment | Wiring fault | Check manual |
| Chamberlain | Obstructed sensor | Sensor moved | No power | Consult chart |
| Genie | Dirty sensor | Alignment | Sensor short | Manual needed |
Non-obvious insight: Sometimes, the blinking pattern can change if you press the remote multiple times. This can help you narrow down the issue—try pressing the button and watching the light closely.
Step-by-step Troubleshooting Guide
You don’t need special skills to fix most garage door blinking light problems. Follow these steps to diagnose and solve the issue.
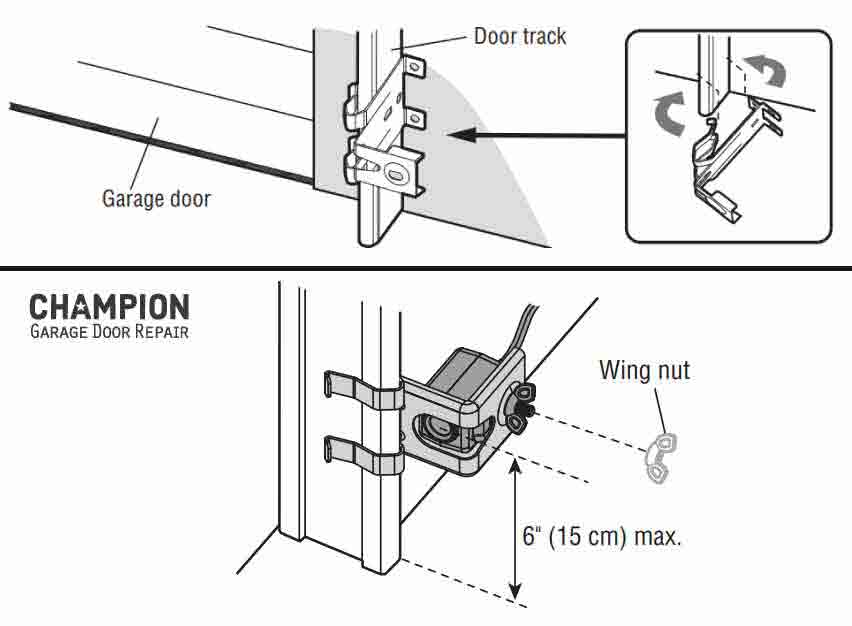
1. Inspect The Sensors For Obstructions
Look at both sensors. They’re usually mounted about six inches above the floor, one on each side of the door. Remove any items, leaves, or debris blocking the sensors.
- Wipe the lenses gently with a soft cloth.
- Check for spider webs, dust, or mud.
2. Check Sensor Alignment
Sensors must face each other directly. If one is slightly turned, the beam won’t connect.
- Stand in front of each sensor and look for a steady light.
- If the light blinks, gently adjust the sensor until the light stops blinking and turns solid.
3. Examine Wiring And Connections
Loose or damaged wires can disrupt the signal.
- Inspect the wires running from the sensors to the opener.
- Look for frayed wires, loose connectors, or signs of wear.
- If you find damage, call a technician or replace the wire if comfortable.
4. Test Sensor Power
Each sensor should show a light when powered. If one light is off, check the connections and the opener.
- Unplug the opener for 30 seconds and plug it back in.
- If the sensor stays off, it may need replacement.
5. Adjust Force And Lock Settings
Some openers let you change how much force is needed to close the door.
- Locate the force adjustment screw on the opener.
- Turn it slightly to increase the closing force if the door stops before closing.
- Make sure the manual lock on the door is not engaged.
6. Try The Remote And Wall Switch
Test closing the door with both the remote and the wall switch.
- If the remote fails but the wall switch works, replace the remote batteries.
- If both fail, the problem is likely with the sensors or wiring.
7. Reset The Opener
Sometimes, resetting the system can clear minor errors.
- Unplug the opener for one minute.
- Plug it back in and try closing the door.
Troubleshooting Table
This table summarizes the main steps and outcomes.
| Troubleshooting Step | What to Check | Expected Result |
|---|---|---|
| Inspect sensors | Obstructions, dirt | Solid light after cleaning |
| Align sensors | Facing each other | No blinking when aligned |
| Check wiring | Loose or damaged wires | Solid lights if fixed |
| Test power | Sensor lights on/off | Both lights on |
| Adjust force | Force setting, lock | Door closes fully |
| Test controls | Remote, wall switch | Works with both |
| Reset opener | Power cycle | Minor errors cleared |
Preventing Garage Door Sensor Problems
Fixing the issue is important, but preventing it is even better. Regular care keeps your garage door running smoothly.
Clean Sensors Monthly
Dust, cobwebs, and debris can quickly build up on sensor lenses. Cleaning them once a month with a soft cloth reduces problems.
Check Sensor Alignment After Weather Changes
Temperature shifts can move tracks and sensors. After hot or cold weather, check alignment.
Secure Wiring
Make sure sensor wires are fastened and away from moving parts or moisture. Loose wires are a common cause of blinking lights.
Avoid Storing Items Near Sensors
Boxes, bikes, or garden tools can block sensors without you noticing. Keep the area around sensors clear.
Test The Door Regularly
Open and close the door weekly to ensure all parts work. If you notice blinking lights, address them quickly before the problem worsens.
Non-obvious insight: Garage door openers can develop electrical interference from nearby devices. If you install new electronics near your garage, check the door’s operation afterward.
Credit: garagedoorchamp.com
When To Call A Professional
Most blinking light issues can be fixed by homeowners, but some problems need expert attention.
- Persistent wiring faults: If you repair wires but the light keeps blinking, a deeper electrical issue may be present.
- Broken sensors: If a sensor is cracked or the light won’t turn on, replacement is necessary.
- Opener failure: If the opener itself doesn’t respond, even after resets and checks, it may need professional repair.
Calling a technician is smart if you’re unsure or uncomfortable with electrical repairs. A professional can diagnose complex issues and ensure your door is safe.
Common Sensor Brands And Features
Garage door sensors vary by brand and model. Understanding the features can help you troubleshoot and choose replacements.
Sensor Brand Comparison Table
| Brand | Sensor Type | Light Indicator | Typical Faults | Replacement Cost |
|---|---|---|---|---|
| LiftMaster | Photo-eye | Solid/blinking LED | Alignment, wiring | $30–$50 |
| Chamberlain | Photo-eye | Steady/blinking light | Dirt, power | $25–$45 |
| Genie | Infrared | LED indicator | Short circuit | $35–$55 |
When buying replacement sensors, match the brand and model to your opener. Using the wrong sensor type can cause permanent blinking lights.

Credit: www.youtube.com
How To Replace Garage Door Sensors
If you’ve checked everything and a sensor is broken, replacing it is straightforward.
- Buy the correct sensor: Check your opener’s model and buy a matching sensor set.
- Disconnect power: Unplug the opener to avoid electrical shock.
- Remove old sensors: Use a screwdriver to detach sensors from the brackets.
- Install new sensors: Attach sensors to the brackets and connect wires as shown in the instructions.
- Align sensors: Make sure they face each other directly.
- Reconnect power: Plug in the opener and test the door.
Most replacements take less than an hour. If the light still blinks, check connections and alignment again.
Safety Tips
Garage doors are heavy and powerful. Always follow safety rules when working with the sensors and opener.
- Unplug the opener before handling wires.
- Don’t force the door closed manually—it can damage the system.
- Keep children and pets away while troubleshooting.
- Wear gloves if handling sharp brackets or wires.
Real-life Example
Susan, a homeowner in Ohio, noticed her garage door wouldn’t close and the sensor light blinked. She found a spider web covering the sensor lens. After cleaning it, the light stopped blinking and the door closed perfectly. Later, a cold snap moved the sensor out of alignment.
She fixed this by gently turning it back. Susan learned to check her sensors after storms and cold weather, saving her from repeated problems.
Non-obvious insight: If your garage is attached to your home, a door stuck open poses a security risk. Fixing sensor issues quickly keeps your home safe.
Frequently Asked Questions

Credit: www.reddit.com
Why Does My Garage Door Light Blink But Nothing Is Blocking The Sensors?
If the light blinks and there’s no visible obstruction, the sensors may be dirty or misaligned. Clean the lenses and adjust their positions. Wiring or power issues can also cause blinking even when the path is clear.
How Do I Know If My Garage Door Sensor Is Broken?
A broken sensor often has no light or a flashing light that won’t stop, even after cleaning and alignment. Try swapping sensors or testing with a new set. If the problem stays, the sensor needs replacement.
Can I Bypass Garage Door Sensors To Close The Door?
Most modern openers won’t let you bypass sensors easily. Forcing the door to close by holding the wall button may work, but it’s unsafe. Sensors are there to prevent accidents. Fix the issue instead of bypassing it.
What Does It Mean When Both Garage Door Sensor Lights Are Blinking?
If both lights blink, it usually signals a wiring problem or a loss of power. Check connections and make sure both sensors are plugged in and receiving power.
Where Can I Find More Information About Garage Door Troubleshooting?
You can find detailed guides and manuals on trusted sites like Home Depot.
Getting your garage door working again is often just a matter of careful steps and a little patience. The blinking light is your system’s way of helping you solve the problem. With regular cleaning, proper alignment, and prompt attention, you can keep your garage door safe and reliable.
If you ever run into bigger issues, don’t hesitate to call a professional—your home’s security depends on it.