Many people buy a Ninja blender for its power and reliability. But when you see a blinking light on your Ninja blender, it can quickly turn your smoothie plans into frustration. What does the blinking light mean? Is your blender broken, or is there a simple fix? If you’ve found yourself staring at a blinking light and wondering what to do, you’re not alone.
Understanding what causes this light, how to troubleshoot it, and ways to prevent it in the future will save you time and stress. This article breaks down the main causes of a Ninja blender’s blinking light, step-by-step troubleshooting, and smart tips for using your blender safely.
You’ll also find helpful tables, examples, and answers to common questions, so you can get back to blending with confidence.
What Does The Ninja Blender Blinking Light Mean?
A blinking light on your Ninja blender is a warning. It tells you something is not right with the blender’s setup or operation. Most often, it’s a safety feature, not a sign of permanent damage. Ninja blenders use this system to keep you safe and protect the motor.
Common reasons for the blinking light include:
- The lid is not locked in place.
- The pitcher or cup isn’t seated properly.
- The blender is overloaded.
- A safety sensor is triggered.
- There is a mechanical problem, like a jammed blade.
Knowing which problem you face is the first step to fixing it.
Common Causes Of The Blinking Light
Let’s look at the most frequent reasons the Ninja blender’s light will blink and what they mean.
1. Lid Not Properly Closed
Ninja blenders have a lid locking mechanism for safety. If the lid is not fully closed or the arrows on the lid and pitcher do not line up, the blender will not start, and the light will blink.
Non-obvious insight: Even a small misalignment of the lid can trigger the light. If you’re in a rush, you might close the lid quickly but miss the alignment mark.
2. Pitcher Or Cup Not Seated Correctly
The pitcher or blending cup must be locked into the base. If it’s off by even a few millimeters, the sensors won’t allow the blender to run, and you’ll see the blinking light.
Beginner tip: Always twist the pitcher until you hear a clear “click.” If you use single-serve cups, make sure they are tightly twisted into position.
3. Overloaded Blender
If you fill the blender past the maximum fill line, or add too many hard or frozen items, the motor can strain. The blinking light here warns you of a possible overload.
Practical advice: Remove some ingredients and try blending smaller batches.
4. Mechanical Blockage Or Jam
Sometimes, food or ice can get stuck under the blades. This can jam the motor, causing the blinking light.
Example: Chunks of frozen fruit or fibrous vegetables can wedge under the blade, especially if you don’t add enough liquid.
5. Unlocked Base Or Power Issues
If the power cord is not plugged in fully, or the blender’s base is not on a flat surface, the safety system can trigger a blinking light.
6. Faulty Parts Or Sensor Problems
Rarely, a sensor or part may be damaged. This could be from wear, a drop, or a faulty connection inside the blender.
How To Troubleshoot A Ninja Blender Blinking Light
If your Ninja blender starts blinking, don’t panic. Follow these steps to identify and fix the problem.
Step 1: Check Lid And Pitcher Alignment
Remove the pitcher or cup. Set it back on the base and twist until you hear a click. Make sure the lid is lined up and locked in place. On most models, arrows or marks must match up.
Step 2: Look For Overload
Open the lid and check if you’ve filled past the max line. If yes, take out some food or liquid. Try blending again with a smaller amount.
Step 3: Inspect For Blockage
Unplug the blender for safety. Remove the pitcher and lid. Look for stuck food or ice under the blades and clear it out. Reassemble and try again.
Step 4: Test The Power Source
Check the power cord and outlet. Try plugging another device into the same outlet to make sure it works. Reseat the blender base on a flat, stable surface.
Step 5: Let The Blender Cool Down
If you’ve been blending for a while, the motor might overheat. Unplug the blender and let it rest for 15–20 minutes before trying again.
Step 6: Reset The Blender
Some Ninja blenders have a reset button on the bottom. If yours does, press it gently with a pen or similar tool. Plug back in and try again.
Step 7: Check For Faulty Parts
Inspect the lid, pitcher, and base for cracks or broken tabs. If a part looks damaged, order a replacement from Ninja’s website or a trusted supplier.
Quick Troubleshooting Reference
Here’s a simple reference to match common issues with fixes:
| Problem | Possible Cause | Suggested Fix |
|---|---|---|
| Blinking light, won’t start | Lid or pitcher misaligned | Re-seat and align components |
| Stops mid-blend, light blinks | Overload or jam | Remove food, check blades |
| No power at all | Unplugged or faulty outlet | Check power connection |
| Blinking after long use | Overheated motor | Let cool for 15–20 min |
Model Differences: Not All Ninja Blenders Are The Same
Different Ninja blender models use blinking lights in slightly different ways. Some blenders have one blinking light for all problems; others use different patterns. Here’s a comparison of how three popular models use blinking lights:
| Model | Blinking Light Meaning | Common Fix |
|---|---|---|
| Ninja Professional BL610 | Blinking when lid or pitcher isn’t secure | Re-seat pitcher and lid |
| Ninja Auto-iQ BL480 | Blinking for overload, misalignment, or jam | Reduce load, check alignment |
| Ninja Foodi Power Blender | Patterned blinking for errors | Refer to manual for code |
Beginner insight: Always check your model’s manual. Some newer models have special error codes or lights for specific problems. If you don’t have the manual, you can download it from Ninja’s official website.
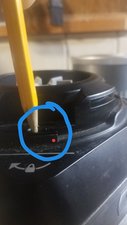
Credit: www.ifixit.com
How To Prevent The Blinking Light Problem
While it’s good to know how to fix the blinking light, preventing it is even better. Here are some smart habits:
- Align parts carefully every time you use the blender. Don’t rush.
- Do not overfill. Stay below the max line, especially with frozen foods.
- Add enough liquid when blending tough or frozen items.
- Clean blades and pitcher after each use to avoid build-up or jams.
- Use only compatible parts made by Ninja. Third-party accessories can cause alignment issues.
- Check for wear on the lid and pitcher locking tabs. Replace if damaged.
When To Seek Professional Help
Most blinking light problems are easy to fix at home. But in some cases, you should contact Ninja customer support or a repair service:
- The blender blinks even after trying all troubleshooting steps.
- You see cracks, broken parts, or exposed wires.
- There is a burning smell or smoke.
- The blender is under warranty—don’t open it yourself, or you might void the warranty.
You can find support options and contact information on the official Ninja Kitchen support page.

Credit: www.wikihow.com
Real-world Examples: What Owners Experience
Let’s look at a few real user scenarios:
Example 1: Maria bought a Ninja BL610. One morning, the blender blinked and wouldn’t start. She realized she hadn’t twisted the pitcher far enough to lock it. After realigning, it worked.
Example 2: David tried to make a frozen fruit smoothie in his Ninja Auto-iQ. He filled the cup above the max line, and the light blinked. Reducing the load fixed the issue.
Example 3: Priya noticed her blender blinking after washing the parts. She hadn’t dried the bottom of the pitcher, and water was interfering with the sensor. After drying, the blender worked normally.
Non-obvious insight: Even a few drops of water on the contact points can trigger the blinking light. Always dry well after cleaning.
Safety Tips For Long-term Blender Health
Keeping your Ninja blender in good shape helps you avoid blinking light issues and extends its life.
- Always unplug before cleaning or checking for jams.
- Don’t blend hot liquids unless the manual says it’s safe. Steam can affect sensors.
- Store the blender in a dry place. Moisture can damage electronic parts.
- Replace worn parts as soon as you see wear.
- Don’t force the lid or pitcher. If it doesn’t lock easily, check for stuck food or misalignment.
Credit: www.reddit.com
Comparing Ninja Blender With Other Brands
How does the Ninja blender’s blinking light system compare to other popular brands? Here’s a quick look:
| Brand | Blinking Light Feature | Ease of Troubleshooting | Safety Mechanism |
|---|---|---|---|
| Ninja | Yes (multi-cause) | Easy | Strong |
| Vitamix | No (error codes instead) | Moderate | Strong |
| NutriBullet | Yes (mainly for misalignment) | Easy | Good |
Insight: Ninja’s blinking light is easier for beginners, but you must pay attention to alignment and cleaning.
Frequently Asked Questions
Why Does My Ninja Blender Blink And Not Start?
A blinking light usually means the lid or pitcher isn’t locked, or the blender is overloaded. Check alignment, reduce food amount, and try again.
Can I Fix The Blinking Light Myself?
Yes, most causes are simple and safe to fix at home. Follow the troubleshooting steps: check alignment, clear jams, and test power.
Does The Blinking Light Mean My Blender Is Broken?
Not always. It’s usually a safety warning, not a sign of damage. If the problem won’t go away after checking all parts, contact customer support.
Will Using Non-ninja Parts Cause A Blinking Light?
Yes, using parts from other brands may not fit perfectly and can trigger the safety sensors, causing the light to blink.
How Do I Find My Ninja Blender’s Manual?
You can download the manual for your model from the official Ninja Kitchen support page.
A blinking light on your Ninja blender doesn’t have to ruin your day. With a little knowledge and careful checks, you can quickly solve the problem and get back to blending your favorite foods. Paying attention to alignment, cleaning, and using the right parts will keep your blender running smoothly for years.
If ever in doubt, Ninja’s customer support is there to help. Enjoy your blending, and keep those green smoothies coming!